
スタイリングと外観
Creating in 3D is about more than just geometry. Cameras, lights, and materials are an important part of creating a visually interesting 3D scene. p5.js has a number of tools that make it possible to transform the appearance of our geometry.
Table of Contents
Camera and View
The camera is an essential piece of a 3D scene; it gives us the sense of space and dimension that we are often looking for in 3D. In p5.js, the WebGL mode provides us with a perspective camera by default, but we can change this using perspective() or ortho().
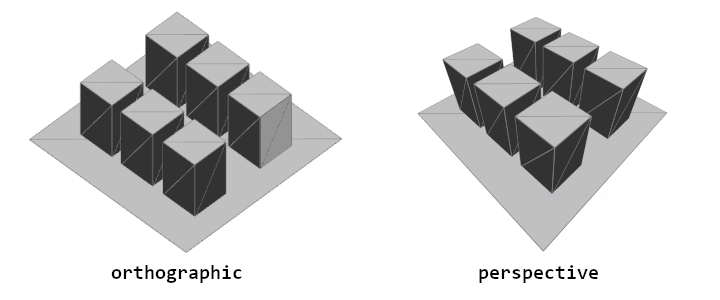
A perspective camera skews objects so they appear to get smaller as they get further away, vanishing at a single point in the distance. This is in contrast to an orthographic camera, where the geometry stays the same size as it gets further away and has no vanishing point.
One setting that we can change with a perspective camera is the field-of-view, or FOV. This is the term that is used to describe how much our camera can see, measured as an angle. In simple examples it might appear to have a zoom-like effect, but it also affects the way that shapes change size in the distance.
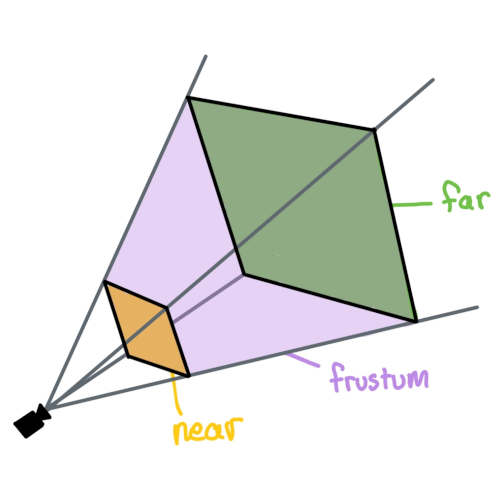
Another important term when working with cameras in 3D is the camera frustum. The frustum of the camera is the shape of the camera's view, a pyramid-like shape within which geometry can be displayed. The frustum includes a near and far plane. The near plane defines the minimum distance that geometry must be from the camera to be rendered. The far plane defines the maximum distance that the geometry can be from the camera. Each of these can be changed to affect how close and how far the camera can see. This process of selectively including geometry is sometimes referred to as 'clipping'.
Cameras can be moved by passing arguments to camera(), but constantly moving and adjusting the camera in code can be tedious, especially when you are experimenting with ideas. p5.js has a special camera method, orbitControl(), that can be used to zoom, pan, and position the camera using the mouse.
A scene can have multiple cameras, but only one camera can be active at a time. Sketches in p5.js will default to having a single perspective camera, but that can be changed by calling either perspective() (with new parameters) or ortho(). camera() can be used to change the position of the active camera and the position that the camera is looking at. Try it out in the sketch below.
Lighting
Lighting is another essential part of a 3D scene. To be able to convey shape and depth in 3D is necessary to have a light source. p5.js has a few different types of light that can be used in a sketch.
- ambientLight()
- Ambient light makes everything display a little brighter, with no consideration for light position or direction.
- directionalLight()
- A directional light shines from one direction, which can be especially useful for communicating depth in a scene, or when a scene needs a 'sun' light. This method accepts a color and direction.
- pointLight()
- A point light emits from a single point in all directions, similar to something like a lightbulb. This method accepts a color and a position for the light.
- spotLight()
- A spot light emits from a single point in a single direction. This light is cast in a conical shape and it's radius and concentration can be adjusted.
- noLights()
- noLights() makes it so that all subsequent geometry is rendered without any lighting. This can be useful when you want flat, unshaded geometry.
These lights should be used within draw(). Up to 5 lights can be used in a scene simultaneously, allowing you to compose a scene with varied and complex lighting sources. Try checking and unchecking the boxes in the following interactive example to see how lighting can be blended together. For each active light source there are visual indicators of their position or direction, just know that these are here for illustrative purposes!
In this next example, try commenting and uncommenting each light and experiment with their parameters.
Materials and Textures
Objects can appear differently based on their material. Materials dictate how light interacts with the geometry and how color (or texture) gets applied to the object. Materials can be varied, making objects shiny, rough, or even textured with images.
In this interactive example, try selecting each of the different materials to see how they affect the appearance of the geometry. You can move your mouse and see the effect that a directional light has on the material.
Try commenting and uncommenting the different lights in this example:
More custom materials can be achieved through using texture(). In short, these are images that can be mapped onto the surface of a geometry. These textures can be imported from an image and can even be generated within code using shaders. To map a texture to your geometry, use loadImage() within preload(), then call texture() before drawing your shape.
While they are useful for changing the appearance of your geometry, shaders are a bit beyond the scope of this tutorial, so make sure to check out the Introduction to Shaders page when you are ready.
Conclusion
Being able to have control over the camera, lighting, and materials will give you much more flexibility to decide how your sketch looks, and it will open up the possibilities for you to introduce your own style to your 3D sketches. The following tutorial in the Getting Started in WebGL series will introduce you to shaders, which will make it possible to change the appearance of your sketch in even more interesting ways.
Other Tutorials
This tutorial is part of a series about the basics of using WebGL in p5.js. Check out each of these other tutorials below.
- Coordinates and Transformations
- Creating Custom Geometry in WebGL
- Styling and Appearance (you are here)
- Introduction to Shaders
Glossary
Camera
The viewpoint of a 3D scene
Perspective
A camera projection that gives the appearance of depth, achieved by making objects in the distance appear smaller.
Orthographic
A camera projection that is orthogonal and unaffected by depth. It gives the appearance of being two-dimensional.
Field-of-View
The angle representing how much can be seen by the camera.
Frustum
The geometric shape representing the full area that can be viewed by the camera.
Near and Far Plane
The near plane represents the minimum distance a geometry must be from the camera to be displayed, while the far plane represents the maximum distance.
Clipping
Selectively showing some geometry and not others, such as when geometry falls outside of the camera frustum.